The Battle of Jutland
The Battle of Jutland was the last major naval clash between German and United Kingdom forces during World War I. The U.K. had higher casualty numbers but claimed a tactical victory anyway, after again bottling up the German fleet. The Royal Navy and the German Navy had already fought two skirmishes at sea, the Battle of Heligoland Bight in 1914 and the Battle of Dogger Bank in 1915. Both had been nominally victories for the United Kingdom. The net result of both was that the German High Seas Fleet was still bottled up in and around the German ports as the third year of the war, 1916, progressed. German U-boats were roaming under the sea along the eastern coast of Scotland and England, but that was the extent of the German penetration of the North Sea. 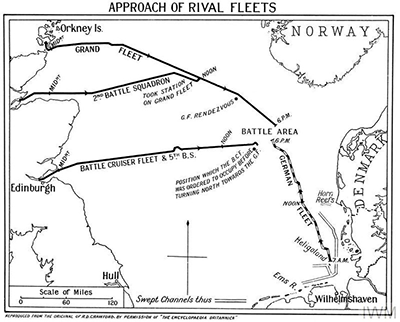
In the spring of 1916, the German Admiral Reinhard Scheer decided on a plan of bait-and-switch, whereby a number of German ships would steam out into the North Sea and lure the battlecruisers of the British Grand Fleet into a pitched battle that would then become an ambush, as the rest of the High Seas Fleet descended on only one part of the Grand Fleet. To that end, Admiral Franz Hipper led a group of German battlecruisers in an attack on merchant shipping in the Skagerrak, the waters between Denmark and Norway. They set out on May 31. As in previous naval battles, the U.K. high command had a greater knowledge of what was going on in the enemy camp, having broken the German code early in the war. By the time that Hipper and his battlecruisers had set sail, the Grand Fleet–in its entirety–had already avoided the U-boats and were lying in wait for the German battlecruisers. The ships commanded by Admiral David Beatty were there, as were the ships of the main battle fleet, commanded by Admiral John Jellicoe. The two fleets found each other at 2:40 p.m. Even though the U.K. high command had the benefit of knowing the German sailing orders, they had mistakenly identified the German fleet as still being in harbor at midday–when, in fact, the High Seas Fleet was steaming northward toward Skagerrak. 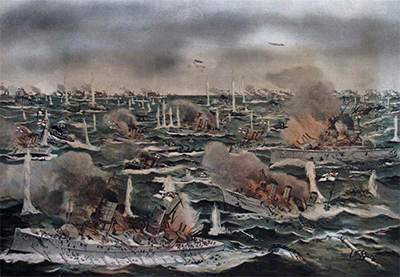
The German ships turned southeast, still hoping to lure their enemy into a trap. Not long afterward, the pursuers caught up. An exchange of weapons fire resulted in the sinking of the U.K. ship the HMS Indefatigable, killing nearly 900. Not long afterward, German shells sunk another enemy ship, the HMS Queen Mary, killing nearly 2,000 more. German attacks also hit Beatty's flagship, the HMS Lion. Despite this, the Grand Fleet had more ships to come. They headed north, turning the tables on the German ships, which followed. Those who had hoped to lay a trap instead sailed into one. In desperation, Scheer ordered his fleet to head southwest, away from the British guns, making smoke to conceal their direction. At 7 p.m., however, the German ships turned again and headed back toward the enemy, at one point exposing their starboard sides to the entirety of the U.K. guns. This enabled the Grand Fleet to "cross the German T," performing an ideal naval maneuver that allowed one side maximum advantage while denying the other side the same opportunity. The final confrontation was not a pitched battle so much as a series of glancing blows, as the German fleet took advantage of the oncoming darkness to escape devastation and sailed back into the home port of Wilhelmshaven. In all, the fleets totaled eight battlecruisers and 29 battleships for the British and five battlecruisers and 22 battleships for the Germans. Both sides claimed victory. German forces quoted enemy casualty figures exceeding 6,500 killed and wounded, whereas German casualties numbered just more than 3,000; as well, the German fleet lost fewer ships, sinking three more than did their enemy. In the U.K., the talk was more of how the German fleet retreated into their home ports and the Grand Fleet still ruled the seas. |
|


Social Studies for Kids
copyright 2002–2026
David White